General - Pages: Edit A Page
To get started adding or editing a product, navigate to Pages in the menu.
Find the page you wish to edit and double-click that row, or click the  button.
| Name |
The value specified in this field is displayed in any menus this page is assigned to. If no values is set in the H1 Override field in the Meta tab, it will also be displayed in the H1 tag |
|---|---|
| URL | This value is automatically generated by the system so you should leave this blank unless you wish to specify your own URLs. The value here is the URL used to visit the page you're editing. For example https://my-website-address.co.uk/my-page-url |
| Content |
The description field is a free format text area where you can outline as much information as possible about the product you sell. You can use the editor, which has similar tools to Microsoft Word, to assist you in formatting in bold or italic for example. Important: As this page may contain HTML that structures the page's layout, it is important that you make a copy of the page source before making any changes. You can do this by performing the following steps:
Please Note: If you fail to back-up this content and require us to restore from an system back-up, a charge will apply |
Ecommerce - Products: Add / Edit A Product
To get started adding or editing a product, navigate to Ecommerce > Products.
To add a new product click  , alternatively, double click a row, or click the button.
| Name | The value specified in this field is displayed on all product list pages (category pages and search results). This value is also displayed on the individual product page as the title unless an H1 override is specified in the Meta Content tab. |
|---|---|
| URL | This value is automatically generated by the system so you should leave this blank unless you wish to specify your own URLs. The value here is the URL used to visit the product you're adding / editing. For example https://my-website-address.co.uk/my-product-url |
| Brand |
If you sell branded products, you can configure brands by navigating to Ecommerce > Brands. Once you have configured the brands you stock, they will appear as a list to select from. Users will then be able to filter by these brands on your website. |
| Tax Group |
If you would like to display tax (I.E: VAT for UK markets), you can configure tax groups by navigating to Ecommerce > Tax Groups. Once you have configured the tax groups, they will appear as a list to select from. Users will then be able to see the tax amounts in their basket and past orders. |
| Description |
The description field is a free format text area where you can outline as much information as possible about the product you sell. You can use the editor, which has similar tools to Microsoft Word, to assist you in formatting in bold or italic for example. |
| Customisation Title |
If you sell a product that the customer can customise, this field allows you to set a title for the customisation. Example: If you sell watches that can be customised by engraving, you would specify the title as Engraving. |
| Customised Description |
If you sell a product that the customer can customise, this field allows you to set a more detailed description of what the customisation is for. Example: If you sell watches that can be customised with an engraving, you would specify the description as Please specify the text you would like engraving on your watch. |
| Customisation Is Mandatory |
If you sell a product that the customer can customise but you also sell as is, then you can leave this checkbox unchecked. However, if you only sell this product as customised, check this box, to prevent users from adding it to their basket prior to specifying a customisation value. |
| YouTube Video ID |
A YouTube video can be added to a product by specifying the relevant video ID. To retrieve this, find the video you'd like to add on YouTube, then click Share. After clicking this, copy the ID which follows the / after either .com or .be. For example, the ID for https://youtu.be/ZzMvjMMUYmA is highlighted in bold. |
| PDFs |
Up to 3 PDFs can be uploaded to each product. If you plan on adding multiple PDFs to any product, please ask us to enable PDF filenames. Enabling this setting will ensure the filenames you upload are displayed. If using this setting, files should be named with this in mind. For example: Brochure.pdf |
| Weight & Dimensions |
There are two sides to the weight and dimension fields. All of the actual fields are for display purposes only. If any of these values are set, a new tab is shown on the frontend of the website called dimensions. Only the fields you populate will be displayed. For the shipping fields these are only required if you are using weight based or volumetric shipping. These values are not displayed on the frontend. For volumetric based shipping, we would need to quote you for this customised functionality, based on your courier's requirements. |
| Normal Price |
This is the standard price for this product. If you sell a product with variations this would also be the price used, unless specific pricing is set against the individual options. |
| Sale Price |
By setting this price, you are putting this product "On Sale". This price will be shown alongside the normal price, with this crossed out and the savings highlighted. |
| Price Suffix |
If you're selling products where the price is for a specific unit or quantity, you can use this field to highlight this. For example, if you are selling carpet by squared metre, you could set this field to Per m2 |
| Cost Price |
The cost price field allows the GP to be calculated as well as allows other reporting to be performed on product pricing. Please note: You require our sales & reporting module to utilise this functionality. |
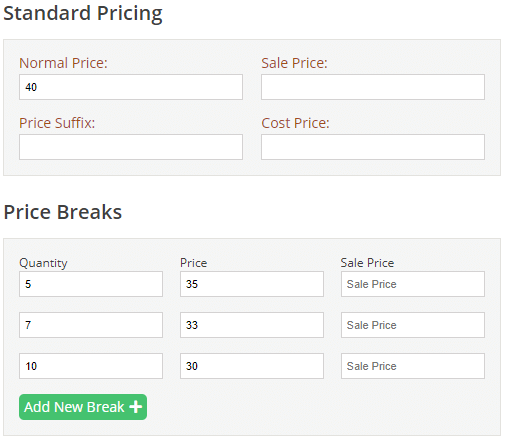
| Price Breaks |
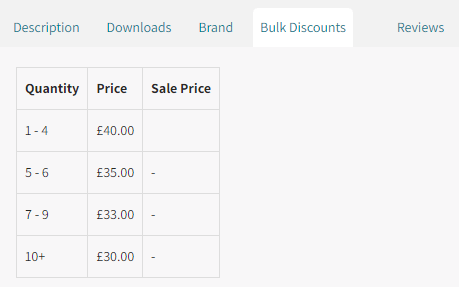
It is also possible to offer discounts on bulk purchases of any given product. An example configuration of this would be:
The above configuration would set the product pricing to the following:
|
| Status |
To quickly enable or disable a product, simply use the Yes and No toggle button. The Yes button being present indicates the product is active. There are also two additional options available on products to prevent ordering:
|
| Linked Products |
If you'd like to display associated products on a product, click the Link Products button under this section and check the box next to any you'd like linking. These products will then be displayed against this product, under the title "You may also be interested in..." |
| Stock Quantity |
If you are using full stock management, this field contains the current quantity of this product that you have in stock. When a user purchases this item, this value is depleted automatically. Alternatively, if you're using only stock flag management, you will be presented with a select field to choose either In Stock or Out of Stock. |
| Low Stock Trigger |
If you are using full stock management, this field contains the stock level in which you would like to display an indicator on the frontend that this product has low stock. For example, if you set this value to 5, then as soon the stock value falls to 5, a low stock message is shown against this product. |
| Stock Location |
To assist in order picking, you can specify a value here to indicate where on your premise this item is located. The dispatch note is then displayed ordered by this field, ensuring all products are grouped together by their location. |
| MPN |
This is the Manufacturers Part Number. |
| GTIN |
This is the Global Trade Item Number. This is most commonly the product's barcode. |
| SKU |
This is the Stock Keeping Unit, meaning it's your own internal reference number. The MPN or GTIN are often used here too, but if you have set up your own, you can define this in this field. |
| Shipping Profile |
Occasionally you may have products that require different shipping costs to the rest of your products. Shipping Profiles allow you to cater for these scenarios. Once you have set a shipping profile up, you will be presented with a list of configured profiles to choose from. Leave this field blank if this product is is not relevant |
Ecommerce - Products: Configure Options
Once you've added a product, you will be able to add configurable options, if required.
To get started, navigate to Ecommerce > Products. Then, find the product you would like to add options to, and double click that row.
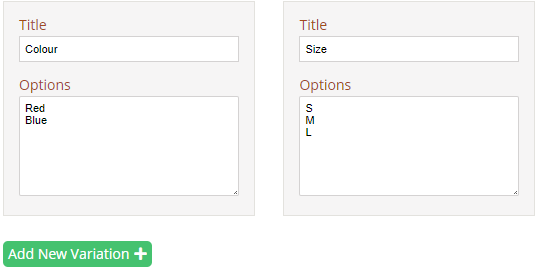
Scroll down to the bottom of the screen, where Product Variations are located. The Product Variations section allows you to list the different aspects of your product where different choices are available. For the sake of simplicity, we will use a t-shirt in this example.
Using the Add New Variation button, add as many product variations as required, as seen in the below example:
As you add the different variations, you will notice the system calculating all of the product option possibilities. Once you have added all of the variations that you need, scroll down to see these options:
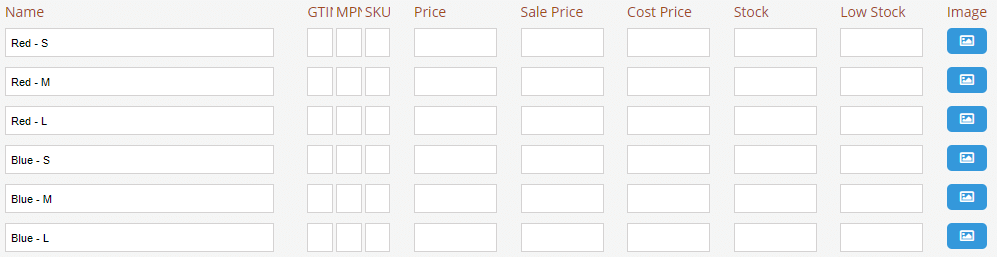
As different sized and coloured t-shirts would have a separate barcode, MPN and SKU, you can add these at the product option level, as opposed to the fields stored at the product level.
The other fields allow you to configure specific option pricing and stock levels. The button in the final column allows you to link an image directly to an option.
Ecommerce - Products: Add / Edit A Bundle
To get started adding or editing a bundle, navigate to Ecommerce > Product Bundles.
To add a new product bundle click , alternatively, double click a row, or click the button.
| Name | The value specified in this field is displayed on all product list pages (category pages and search results). This value is also displayed on the individual brand page as the title unless an H1 override is specified in the Meta Content tab. |
|---|---|
| URL | This value is automatically generated by the system so you should leave this blank unless you wish to specify your own URLs. The value here is the URL used to visit the bundle you're adding / editing. For example https://my-website-address.co.uk/my-bundle-url |
| Description |
The description field is a free format text area where you can outline as much information as possible about the bundle. You can use the editor, which has similar tools to Microsoft Word, to assist you in formatting in bold or italic for example. |
| Products |
Click the Select Products button to load a product selection pop-up. From the pop-up, find any products you want to include in the bundle and click the Select checkbox. |
| Price |
Set this value for the total price to purchase this bundle of multiple products. |
Ecommerce - Brands: Add / Edit A Brand
To get started adding or editing a brand, navigate to Ecommerce > Brands.
To add a new brand click , alternatively, double click a row, or click the button.
| Name | The value specified in this field is displayed on the brand list page. This value is also displayed on the individual brand page as the title unless an H1 override is specified in the Meta Content tab. |
|---|---|
| URL | This value is automatically generated by the system so you should leave this blank unless you wish to specify your own URLs. The value here is the URL used to visit the brand you're adding / editing. For example http://my-website-address.co.uk/my-brand-url |
| Description |
The description field is a free format text area where you can outline as much information as possible about the brand. You can use the editor, which has similar tools to Microsoft Word, to assist you in formatting in bold or italic for example. |
Ecommerce - Tax Groups: Add / Edit A Group
To get started adding or editing a brand, navigate to Ecommerce > Tax Groups.
To add a new tax group click , alternatively, double click a row, or click the button.
| Name | The title of the tax group |
|---|---|
| Rate | The % rate as a decimal |
Ecommerce - Discount Codes: Add / Edit A Code
To get started adding or editing a discount code, navigate to Ecommerce > Discount Codes.
To add a new discount code click , alternatively, double click a row, or click the button.
| Code | This is the code you would like your customers to enter to receive this discount. |
|---|---|
| Type |
|
| Value |
If you select either Amount Off or Percentage Off, then a value will be required.
|
| Minimum Order | If provided, the customer's basket sub-total must be equal or greater than this value. |
| Maximum Uses |
If this field is not left blank, then customers will only be able to use this code the entered number of times. Specifying a value here will also prevent guest checkout as users will be forced to create an account. |
| Prevent Sale | By checking this box, any products with a sale price will not be discounted |
| Also Free Delivery | By checking this box, you will also give your customers free delivery, on top of the configured discount |
| Date Range | Specify the date range you would like this discount code to be accepted during |
| Restrictions |
Discount codes can also be configured with various restrictions so that they only apply to specific:
|
Ecommerce - Shipping: Add / Edit A Method
To get started adding or editing a shipping method, navigate to Ecommerce > Shipping Methods.
To add a new shipping method click , alternatively, double click a row, or click the button.
| Title | This is the name of the shipping method. |
|---|---|
| Tax Group | If tax is applicable, select a tax group. |
| Tracking URL |
If this is a tracked shipping method, you can specify a URL here to be used when dispatching orders. For example: https://www.royalmail.com/track-your-item#/tracking-results/*TrackingNumber* The *TrackingNumber* will then be swapped by the system to the tracking number you specify during dispatch. |
| Exemption Links | If any shipping exemptions are specific to the method you are configuring, you can check the box next to the listed exemptions in this section. |
| Product Flag |
If any custom product flags have been configured and you'd like to set up shipping methods that should be displayed if a product containing this flag is in the basket, then specify the flag here. If this applies to you, please contact support via to find out the correct value to specify here. |
| Collection | If this is a collection method, please check this box. |
| Countries | Check any countries that this shipping method applies to. |
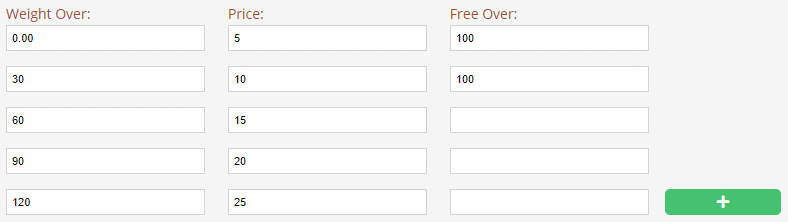
| Pricing |
Under the pricing header, you have the option to configure weight-based shipping. See the below example as a reference point:
The above configuration indicates the following:
|
| Maximum Weight |
In this field, set the maximum weight that can be carried. This will prevent this method from being used if the basket contents' weight is greater than the maximum weight |
Ecommerce - Shipping: Add / Edit An Exemption
To get started adding or editing a shipping exemption, navigate to Ecommerce > Shipping Exemptions.
To add a new shipping exemption click , alternatively, double click a row, or click the button.
| Title | This is the name of the shipping exemption. |
|---|---|
| Type |
|
| Amount |
If the type is set to either Price Decrease, Price Increase or Specific Price, then set the amount in this field. |
| Text | Specify a description here to display to your customers. |
| Minimum Order |
If a minimum order value is specified here, this will not be triggered unless the sub-total is equal to or greater than this value. |
| Exclude Collection |
Check this box if you'd like to exclude any collection methods from this exemption. For example, if you have configured a price increase for a specific product flag, you can exclude the price change if your customer comes to collect it. |
| Postcodes & Countries |
These fields allow you to specify countries or postcodes the exemption will apply to. |
Ecommerce - Shipping: Add / Edit A Profile
Occasionally, the shipping that suits the majority of your products doesn't fit some products. For example, let's say you stock some very small items that can be sent out much cheaper by using Royal Mail. For these scenarios, you can set up shipping profiles that are linked directly to products.
To get started adding or editing a shipping profile, navigate to Ecommerce > Shipping Profiles.
To add a new shipping profile click , alternatively, double click a row, or click the button.
| Name | This is the name of the shipping profile. This will be shown in the select field when adding or editing a product. |
|---|---|
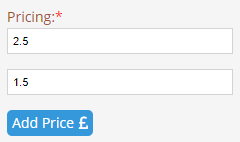
| Pricing |
The pricing of shipping profiles works slightly different to shipping methods. These prices apply per product. You can also configure a price for subsequent products, so if one product has been added further products can be dispatched cheaper.
For example, in the above example, shipping for the first product with this profile assigned to it would be charged at £2.50, however any additional products assigned to this same profile would be charged at £1.50. |
Ecommerce - Orders: Change Delivery Address
On occasions, it is required to make changes to an order's delivery address based on a customer request. This can be achieved providing the order is set to either Confirmed or In-Progress.
If this is required, find the relevant order and either double click the row or click the button.
On the order screen, scroll down to the delivery address section, as shown below:
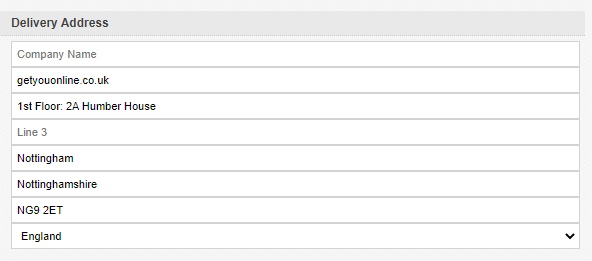
Providing the order is at one of the aforementioned statuses, the address will be displayed as form fields, as shown in the example. Make any required changes and click the  button.
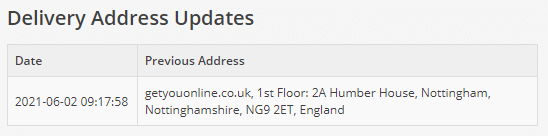
As a precaution, all delivery address changes are logged, so the previously defined address is not lost. This ensures the original data is available in case an order is updated incorrectly. If any changes have been made, they can be previewed in the right-hand column under the title Delivery Address Updates, as shown below:
Ecommerce - Orders: Dispatching
When an order is ready to dispatch, find the relevant order and either double click the row or click the button.
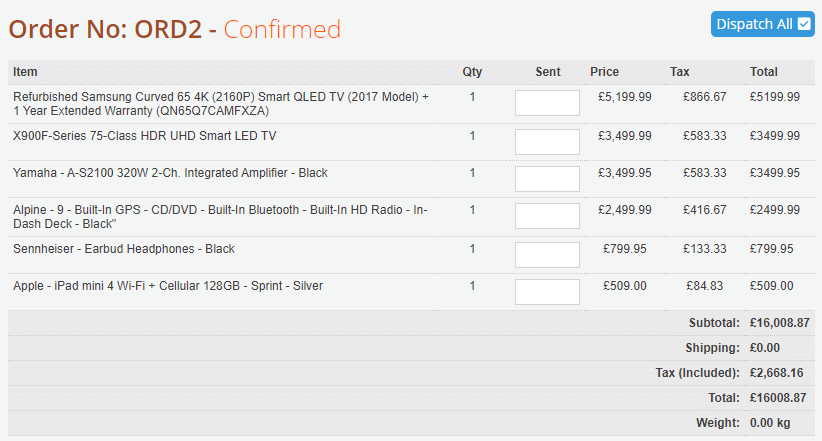
As shown above, on the order screen, you will be presented with the order details. To the right of the ordered Qty column, there is a Sent column. Specify the quantity of each product that you are dispatching.
If you want to dispatch any of the columns exactly as ordered, simply click the 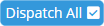 button. Clicking this will automatically populate any blank fields with the quantity ordered by the customer.
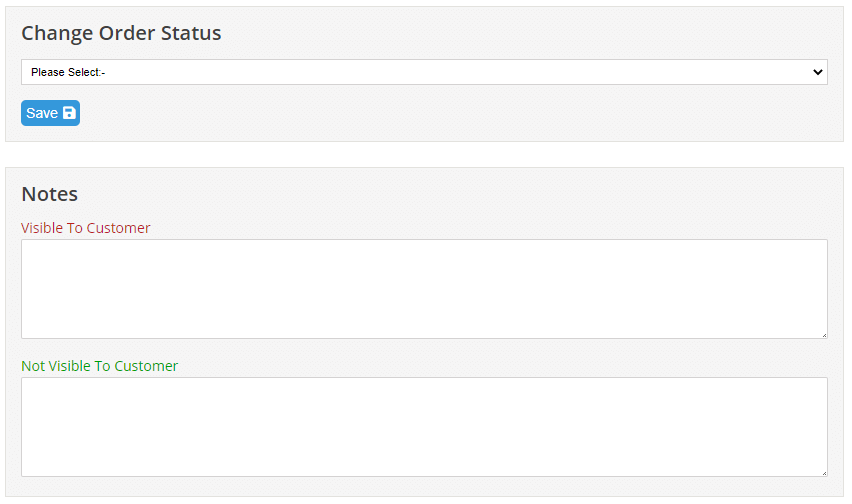
Once you're happy with the entered values, scroll down to the Change Order Status section, as shown in the above image.
Select the relevant status you'd like to change the order to. The available statuses for a confirmed order are: Dispatched, Part Dispatched, Cancelled, Refunded or In-Progress.
The Part Dispatched status should be used if you are wanting to dispatch an order with different quantities than those that were ordered AND you intend on sending the remaining items at a later date.
There are also two notes fields that can be used here. One field is for internal notes only, the other is where a message can be added to the order that will be visible to the customer.
If the shipping method the customer selected is configured with a tracking URL, you will also see a field where you can enter the relevant tracking number:

Ecommerce - Orders: Substituting Items
There may be occasions where a customer would like some products adding or swapping on an order. This can be achieved using two different order adjustment features.
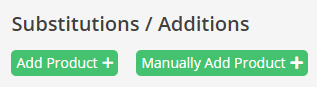
To perform one of these actions, use one of the following buttons, as shown in the above image:
- Add Product:
This feature will load a pop-up product list. Using the filters, find the product you would like to add, enter a quantity and click the + icon as shown below: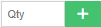
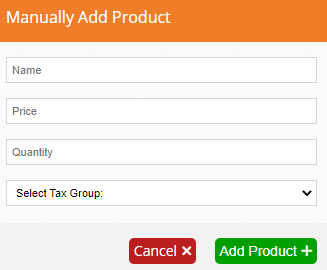
Perform this same action for every product you'd like to add to the order; - Manually Add Product:
This alternative feature can be used to add an additional charge, or to add a product you may not normally sell on the website. Fill in the form, shown below, and then click Add Product: